Wordaizer -
Help Wordaizer -
Help |
Wordaizer -
Help
Functions and features
The following topics are addressed in this
chapter: Source/input
text file The text file is a file
with the .txt file extension. The application only reads ANSI files, e.g. by
saving this file via NotePad or by exporting the file as a plain text file in
e.g. Word. The file must contain words. The structure is not defined, so both
long sentences (no limit to the amount) and lists of words can be
offered. The type
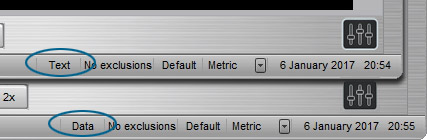
of file is automatically detected. The file that has no valid frequency data
(e.g. typos in data or no ':' used) is considered a
text file. The interpretation of the application can be seen in the status
bar: either 'Data' or 'Text'
is shown.
The picture files are
used as source files for colour determination. See the paragraph on 'Using a picture as colour source', further down this page.
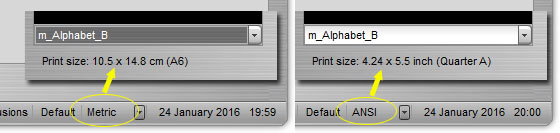
Paper size: metric or
ANSI
In
the statusbar a small indicator is provided to indicate if you would like to use
metric or ANSI paper sizes. The default is metric and the paper sizes follow the
A6..A0 range, indicated in cm. With the ANSI range the paper sizes follow
the ANSI A..E range, indicated in inches. For smaller sizes than 8.5 x 11
inch (ANSI A) we use 'Half A' and 'Quarter A' sizes. This setting is stored
when existing the application. The application window will correct its size when ANSI is selected to
fill-out the result in teh viewers. The masks however must remain in metric format (300
x 212 pixels), and are corrected for the shape ration difference by adding
a black rim top and bottom. The resulting mask is therefore not distorted
in ANSI mode (300 x 232 pixels). The picture size is indicated below the mask preview (cm or inches).
Colour
variations Using a webpage content as text
source Since
web pages usually contain unpredictably variation of content, there is no
way to find a way if the page will be correctly loaded or not. In many cases
this will be trial and error. For instance: http://www.google.com will generate an error, but
http://www.google.nl won't. Many common words are
already filtered out, but HTML, css and java script etc. is too elaborate
to completely remove automatically, so the content can be exciting or pretty
dull, depending on the page. Colours from
schemes and palettes In the example picture below the effect is seen
when a different background is selected from the palette file (move the
slider): The picture below shows the effect of the selected
harmony model (right picture) and the effect of a variation of the harmony (left
and middle pictures): Custom
word Size
method Example: suppose, the word
frequency is selected as the source for the font size and the highest
word frequency is 80. Then, when the actual frequency of a certain word in
the cloud is 4, the horizontal axis value (see graph) is 80/4 = 20 and therefore
the corresponding font size is appr. 18 for the steepest curve, and 50 for
the straight curve. Ratio horizontal and
vertical words On-the-fly
mask Size tuning A fourth method to use high density word cloud and still use a mask is to
make use of a smaller masked area. As explained above, the white areas are the
positions where words are placed. If a mask is made with only the interest area
at the center, smaller and denser clouds may be generated. The example below
explains this. Smaller fonts may then be needed.
Source file and input file: how to create the
perfect input file
Using
a webpage content as text source: an alternative way to create a wordlet from
text
Colours from schemes and palettes: change the colour
palette by a simple one-click method
Custom word: when only one word is used for the entire
wordlet
Size
method: how to set the size of the words
Ratio
horizontal and vertical words: how to change the balance of horizontally and
vertically placed words
On-the-fly mask: alternative to a built-in mask, and make
your own special mask
Size
tuning: when the mask is not fully filled with words, this will help to make
it perfect again
Effect of word density: changing the density of words on
the page
Effect of orientation and angle: words can be placed at
every possible angle
Effect of font size ranges: the range of the largest and
smallest font can be set
Using
a picture as colour source: alternative of using a pre-set colour
palette
Fonts: load your own fonts, and all fonts available in
the system
Two
fonts in one wordlet: make the wordlet more exciting and use two fonts in one
wordlet
White
spots: in case you experience white spots when using transparent pictures
(.PNG file format) this will help you solve it
Editing wordclouds: add
new words, and change the colour of each individual word
Supersize text file
processing
Extra
features: all about colour effects, special functions and
customized colours
Using a
specially designed
mask to add images to your wordlet (and a
one-file solution)
The application has two different type of
input files:
The tilde (~) sign must be used to keep words together that must be
kept together. All other punctuation characters and spaces are removed
automatically. Examples of text file input are given here.
With build
20 a new type of text file can be input: words with their predetermined frequency. This file is referred
to as 'data file', in contrast of a 'text file'. The application
automatically recognizes this type of input file. There are a few basic rules to
keep in mind when providing this type of input file. If one or more lines do
not follow these rules, the file is considered a normal text file:
In the picture below the effect is shown of the
two controls 'colour variation' and 'Variation'. On the left 8 colours are seen, where the
starting colour is ocean green (top-left colour patch). The other 7 colours
gradually shift to blue, so: climbing up the hue scale. Because of the low variation (= 1),
the scale show some colour shifts from the
original colours. These are the colours at the lower half of the colour swatch area.
The black rim of the colour patch indicates the colour of the
background.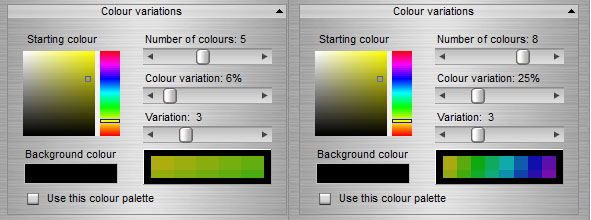
The picture on
the right also shows 8 colours, where the starting colour is now orange, which has
a lower hue value. Because the colour
variation is higher (25%), the gap between adjacent colours has
increased, and the purple colour at the top of the hue bar is almost reached.
Also the variation is set to a higher value (now
4).
Wordlets can be made from a pre-loaded text file, but also using an URL of a
web page. To activate that feature simply provide the URL and check the
tickbox. This feature is only available for licensed users. The URL must contain
valid data. If the application doesn't find valid text (the web page
source data is used) a warning is given, and the text from the file is
used (as a normal wordlet). You'll find the URL setting in the 'Text'
section.
The schemes and palettes are quite different. The
colour scheme follows a precise mathematical model for
colour harmony, where the vertical slider varies the harmony distance between two
points in the colour space. The colour palettes are
predefined colours, from GIF files, and are actually selected by the user. These
files are pre-installed in the directory 'colours',
and the user can add more colour palettes, by simply saving a GIF file in that
folder having the right palette colours (see here). The application only takes the
first 20 colours and discards the rest. The palette file must be a valid GIF
file, with the 'gif' file extension.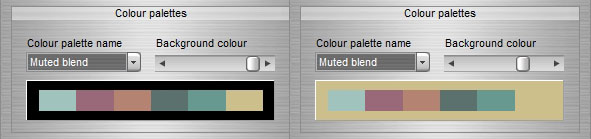

When the option of a 'Custom
word' is selected, the picture below shows an example. The word in
the edit box is not very original: 'hello world'; and the m_mondriaan.jpg mask was used. Any word in the edit box can
be used, but be aware that very long words are difficult to position as a whole.
Short words fit best in this feature.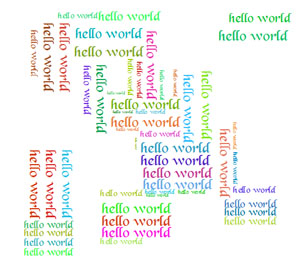
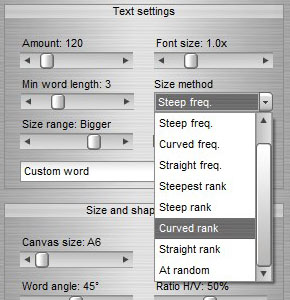
There are 9 different size method engines. Each engine
calculates a different font size with decreasing word frequency and decreasing
rank. The picture below shows the drop-down list of the engines.
The graph below shows the
steepness of the font size with decreasing rank or word frequency ratio. The
horizontal axis for frequency is the ratio of maximum frequency/actual
frequency. In this graph the start font size is assumed to be 60, while 100
words are printed. The minimum font size is set to 10 (which is a factor of 6
smaller, see also the explanation of 'size
range').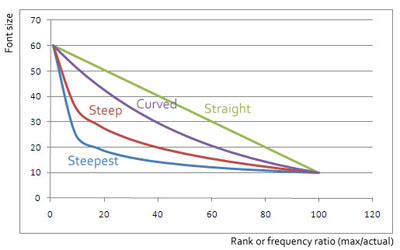
In case the word rank is
selected as the source for the font size: the first word and the 20th word on
the list then have a font size of 60 and 18 (or 50 for the straight
curve).
In the picture below the effect of this
control is shown. From left to right the probability of printing vertical
words in the cloud increases from 0% to 100%. 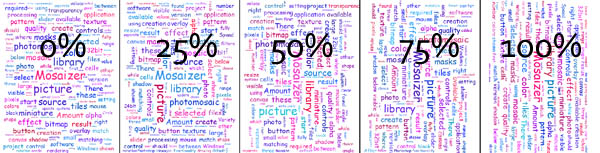
The
application can not accurately set the desired ratio, but instead a
probability generator determines the amount of vertical words. This
way the application gets very close to the desired ratio value.
The
application has pre-installed masks, but the user can make a mask on the fly.
The 'Mask'
area shows the loaded mask (if any is
loaded). The masks are selected either via the drop-down mask listbox, or by
loading a mask file or by manually drawing a mask. In the picture below such a
manually drawn mask is shown. 
Also shown in the picture above,
the effect of pen thickness is demonstrated: for the 'number words' correspond
with the pen thickness. As the picture shows, a pen thickness of 60 is well
readable in the word cloud, also 40 and 20 goes well, but a pen thickness of 10
is pretty low. Smaller fonts are then needed to also fill the cloud with words
in this size.
'Mask' use
the black to block words in the cloud, and white to allow words. If a word has
one pixel or more overlap with the corresponding position in the mask, the word
will not be drawn. The user can switch between 'Pen'
and 'Eraser'
to draw (in white pen colour) or erase (in
black pen colour). This way simple mask corrections and drawing editing is possible.
The font size is a
major control to generate perfect word clouds. In the example below the effect
is shown when a font size is selected that is too small to fill the entire mask.
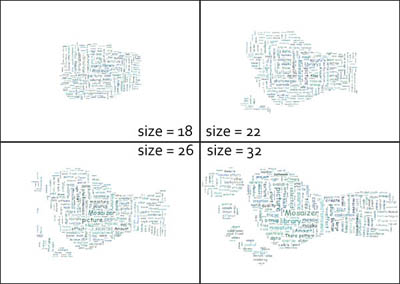
Only when the size is 32, the
entire mask is finally filled and the masked word cloud is now ready. There is
more than one way to increase the size of the cloud on the canvas:
Effect of word
density
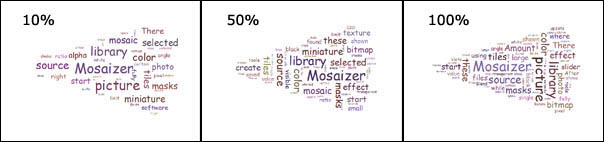
The picture below shows the effect of the
density control on the word cloud result: the lower the density with the same
font size, the less words are placed in the cloud. But also: the less dense, the
less calculation time. This density is a simple way to first look at the total
result in a quick and dirty way, and then tune to the details, where the
calculation time may be higher.
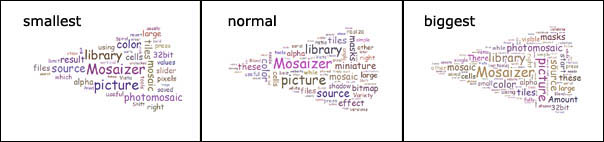
Effect of font size
ranges
The control for 'Font size range' is
useful to control the difference between the largest fontsize and the smallest
fontsize in the final cloud. The range has limited values, and ranges from one
eighth to one fourth of the maximum fontsize (also referred to as the 'Basic font size'). The example below show the
difference for three settings: smallest, normal and biggest.
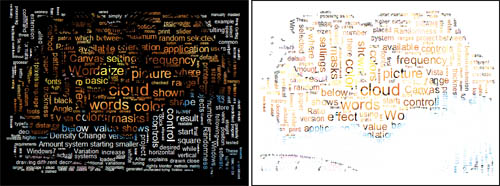
Using a picture as colour source
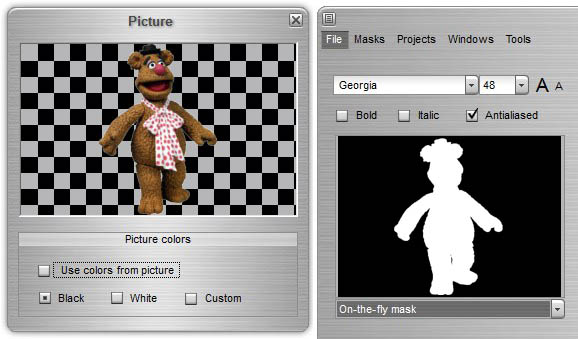
This feature is an alternative to selecting the colours of each of the words. Instead, a picture can be opened, and when the word cloud is made, the colours of the words will be derived from this picture. When the box 'Use colours from the picture' is checked, this feature is activated. If not checked, the mask will be stretched to match with the (rectangular) work area. There are two options:
There are a few aspects that the user has to keep in mind:
In case of transparent pictures (such as with PNG files, a transparency mask may be available), the mask is used as the picture mask. This way a picture can be perfectly built up from word in the desired shape.
The picture below shows the result of the two possible options...
..and the picture below shows the effect of the presence of a picture mask, when the source file is of PNG file format.

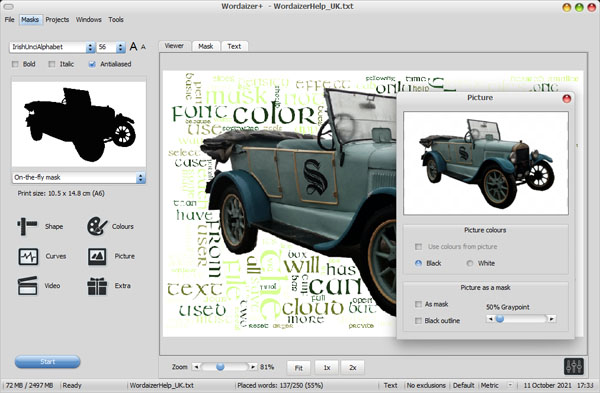
A picture as the source for the mask
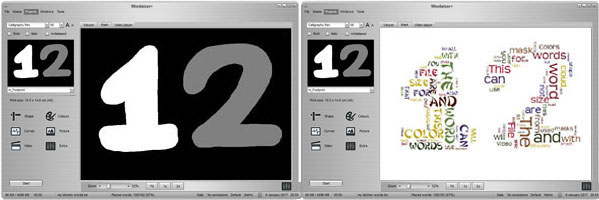
The application can also create a mask from a picture (see example below). To do so you only need to check the tick box 'As mask' and a mask is created. The mask uses a smart algorithm to extract a black white mask from a coloured picture. In most cases this goes well. In some cases you still need to indicate where the so-called '50% Graypoint' is. For light pictures the graypoint should be set a bit higher to create a more pronounced mask. The application basically makes two masks: an outline mask (not shown in the application), and a fill-mask (as depicted below). As a consequence the wordlet is created in two passes: first the outline, then the fill.
In case you like to make the outline stand out from the rest, you should set the 'Word angle' to maximum of 90 degrees, with 'Random angles' activated. This way the outline is neatly followed in rotated words. To make it even stand out better you can also make the outline black ('Black outline') but in that case you also need to colour the canvas other than black of course.

Fonts
The
application loads the most common fonts and a series of specially selected
fonts. System fonts are not loaded by default. Only for licensed users the
system fonts can also be loaded. To load all the available system fonts (in
addition of the specially selected fonts), you need to first check the option
'Load system fonts' (via 'Tools' ), and
restart the application. Fonts are only loaded at start.
The special fonts
are temporarily loaded, and not added to the system fonts. In case you save the
results as an .emf file you need to consider also installing the used font in
your system, to be able to print the result later with a different
application with the correct font (e.g. Adobe
Illustrator).
Two fonts in one
wordlet
This option is
only visible and available when a commercial license is purchased. Two fonts in one
wordlet can be achieved by using a dual-coloured mask. There
are strict rules for user defined masks, and if not followed correctly, the result
won't be as expected. It is recommended to use the built-in mask editor in
case of problems. A normal mask is black and white, where the white space allows for
placing text. In grayscale values: black
has a gray value of 0, while white has a value of 255. The third
grayscale value must be 128 (aka '50% gray'). To use two fonts in one wordlet
the user has to draw a white area for the first font, and
a 50% gray area for the second
font.When the user prepares a mask in e.g. Photoshop, make sure these
values are exactly correct. In the picture below the two Mask selectors are
seen ('Mask 1'
is the default).

To create a dual-font wordlet is quite simple:
The result is a dual font picture. There are some limitations on colour selection: this has to be done before the first mask is used. In case the colour is changed after mask 2 is applied (and the wordlet now has two fonts), the first font result is erased.
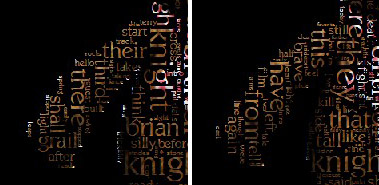
White
spots?
When a .PNG picture is used with a transparency channel
available, this channel can cause some white spots at the edges of the wordlet.
This 'bug' is influenced by the accuracy at which the application determines if
a word can be placed. In many cases the white spots disappear when a higher
density value is selected. In the example below:
left: density = 55%, right: density = 85%. In some extreme cases the white spots may however never completely disappear. It is
only visible when a black background is chosen.
Word cloud
editing
There are
two types of word cloud editing: adding new words to the clour, or changing the
colour of an individual word. The first will be explained in this paragraph, the second is already outlined in Lesson 10 in
the Tutorial chapter. We will not repeat this here. Adding new words to an
existing would cloud only works for horizontally and vertically placed words, so: not for angled words and bended words.
Adding words to a word cloud
This feature is only applicable after a word cloud has been generated. You cannot start from scratch (perhaps in a new version). There are two easy steps (see screenshot below):
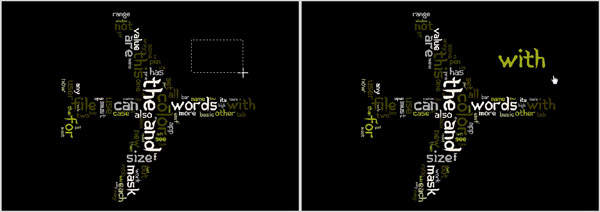
Step 1: create a word cloud. Any shape and size will do. Step 2: click anywhere on the (empty) background, and select a rectangular area in which you wish to position a new word (left-click -> drag pointer, release left mouse button). The application will immediately try to match any word into the selected area. If you select a very wide area, it will take longer words. If you select a vertically area, it will place the word vertically:

In the current version only horizontal and vertical words can be placed this way. Perhaps we will add the possibility to place words under an angle. If the area is too small to place a word it will warn you that it couldn't find a fitting word to match with the selected area. The word is placed at the center of your area. In case other words or part of words are found in your selection, the result is a bit more unpredictable: in case only a vertical word will fit in you might find the new word placed vertically, even when you have selected a horizontal area. In case you select an area where many words are already seen, it will use a smaller font size (minimum 6 pt), that will satisfy the placement possibilities. This way you can easily add small words within other words:
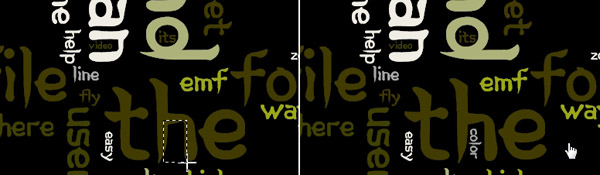
The small word colour fits nicely in the 'h' of the word 'The'. Two other words were also adde this way: 'video' (in the 'n') and 'its' (in the 'd'). The size of this word cloud was A4, with a font size of 104, large enough to squeeze in smaller font words. The font size for e.g. the word 'color' is 14, whle the word 'the' is font size 104, 10 times larger!
This word addition feature can be un-done 10 times. Meaning: you can add 10 words and still revert to a previous result, basically omitting the last added word. When you use the undo feature, you cannot redo it. So... once undone, it's gone. The undo is activated using the standard Windows key combination CTRL+Z keys (first press the CTRL key, then also press the 'Z' key).
Supersize text file
processing
The application can relative handle large text files. In case the file is
very large (e.g. > 1 MB text file), the processing is gets more cumbersome,
and will take more time. Is such cases it's better to pre-process the file,
and extract the unique words from it. This word analysis and extraction is then
already done, and a ready-made file will be created, with frequency data for
each found unique word. The advantages are apparent: less time to load a file,
and much less time to analyse, process, and draw
a wordlet from it.
This function is located under 'Tools' > 'Supersize text files' . The following window is popping up:
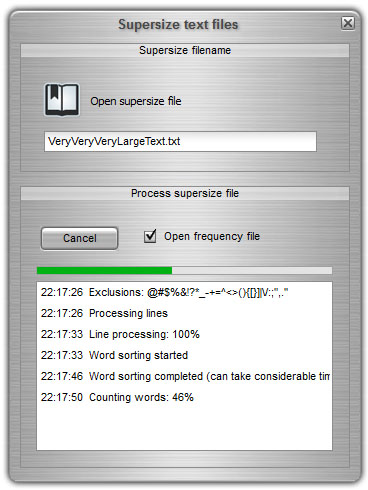
The top part of this panel is used to select a new 'supersize' text file, here 'VeryVeryVeryLargeText.txt'. After loading you can now initiate the file processing by pressing the 'Start' button (here shown as 'Cancel' because the processing has already started). In the list at the bottom you can follow the processing steps. The example file is over 8 MB in size, and appears to have more than 716 thousand words, of which it found over 19 thousand unique words, ranging from 170 thousand times to 1 time. This file was processed in about 20 seconds. To automatically open the new frequency file after being created, also check the tickbox 'Open frequency file'.
To create a wordlet from it, you can close the Supersize panel, and load this file (saved as 'VeryVeryVeryLargeText_Freq.txt' in the same folder), as a new text file. Loading can take some time, but usually 5-10 seconds at most. Once loaded in the application you can now create wordlets from it. Creating a wordlet will take between a few seconds to minutes, depending how many words you will choose. The default amount (250 words) will only take seconds to process.
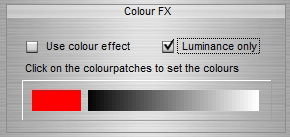
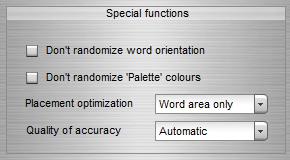
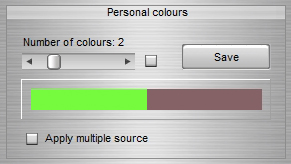
Extra
features
Some special effects are available in the tab 'Extra'. A couple of useful and exciting functions are
provided:
Below are two examples of the colour effect. One fading to white, the other fading to black.
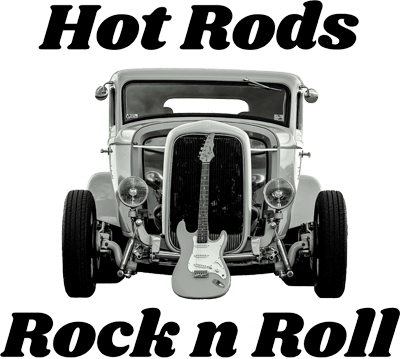
Using a specially designed mask to add images to your wordlet
We will demonstrate a nice feature to create a mask that fits perfectly around a real image. The end result will look like this:
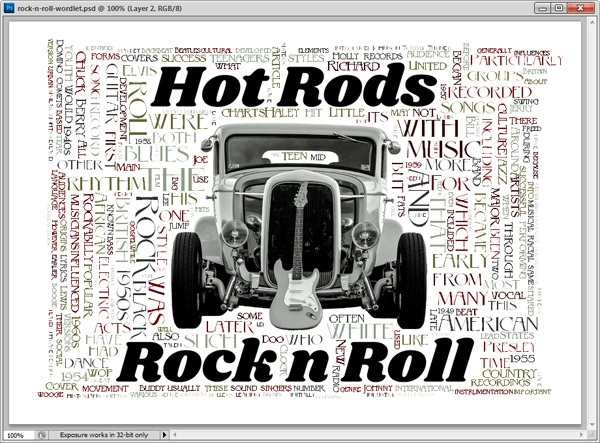
Above you see the results in a Photoshop window, with two layers: one layer being the hot-rod image and big text, the other being the wordlet, which fits perfectly around the shape of the hot-rod image.
Step 1: select an image. This image should have white spaces, where the text may be placed. This is the image we selected:
We opened this image in Photoshop, and added some more white around it, and it also had the correct aspect ratio that it could be printed on an A4 paper.
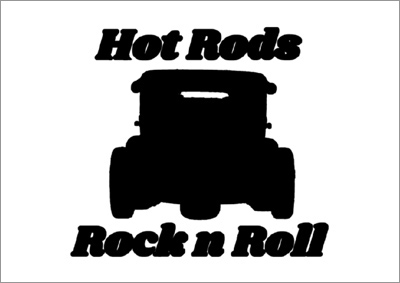
Step 2: delete the image by replacing any part of the image with black. This way we create a fully new mask from the image. In this case it was easy: select any white (non contiguous) and inverse the selection, then expand the selection to create a kind of 'safety edge', and filled the selection (= car + text) with black. The result is this, where we added a slight gray edge, to show the actual size of the mask (800 x 600 pixels in size will suffice):
Step 3: open Wordaizer and load the files:
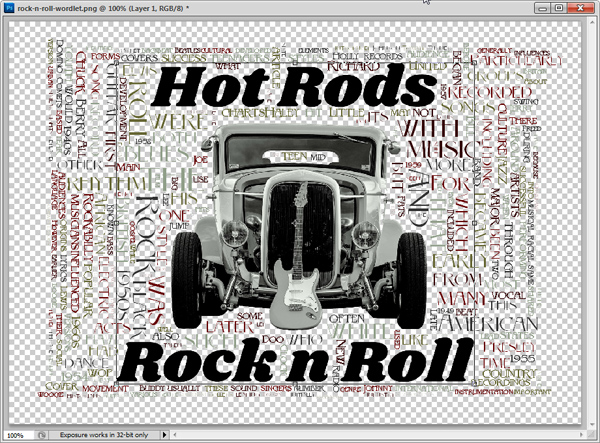
Step 4: select the font, size, colours etc, and create a wordlet. It will now place words only in the white part of the mask. This is what it looked like when we were satisfied with the wordlet settings:

Finally we saved this image, and re-opened it in Photoshop again. You can now also close Wordaizer.
Step 5: merge the two images together. It was a bit of resizing work to make the two images match, but the end result is quite satisfying. A screenshot from Photoshop, showing the two layers:
You can now also change the background colour as you wish, since we used the 'Save as transparent .png' as the save option.
An alternative to the above approach: double-layered PSD (Photoshop) files
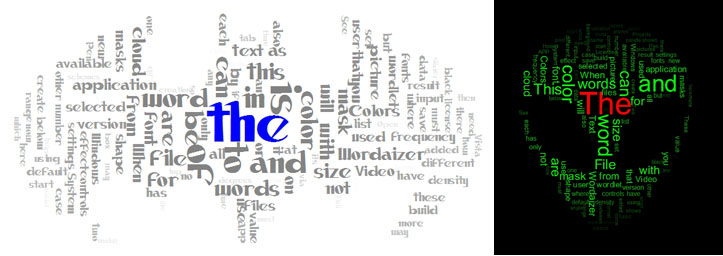
The above effect is created by using two files: a transparent image file and the separate mask image, derived from the same source. A new option has been made available to use only one PSD file: the first layer is the source image, the second layer is the mask. The image could look like this:

where the left image is the base-layer image (can be transparent, not needed), and the right image the mask (layer on top of the base layer). An example file is pre-installed.
Open this image via the menu 'Masks' 'Open layered mask' and select the PSD image. Only PSD images can be opened as an image+mask combi file. Then proceed as usual. The image is found in the 'Picture' window, while the mask is shown as the on-the-fly mask, and also at large in the 'Mask' tab. To remove the combi image + mask, discard the combi via the menu 'Masks' 'Remove layered mask'. The on-the-fly mask will remain the current masak, but the underlying image will be removed.
An example of using this mask was simply created by opening the layered mask and then, without any other additional step, create the wordlet. Please note that the mask uses the white for placing text. In case the car was white and the rest black you would find that all text is placed onto the image (in this case).
A couple of limitations and warnings when using PSD files: